
Saturday, September 2, 2017
Saturday, August 26, 2017
August 24th, 2017
Thank you for visiting my blog, I hope you find it very informative.
I want to start by giving a little background about myself. I'm a single father of an wonderful 8 year old little girl. After being single for almost 8 years, I was lucky enough to meet an incredible woman and we are currently engaged. She lives in a different country and we are going through the visa process so she can relocate to the US and we can get married. The process should be complete in about 6 week and expect her to be able to move to the US in October and finally married in late October :)
I do have a technical background and have dabbled in Bitcoin mining years ago using my gaming rigs. Being that my family in going to be growing shortly and my fiance will be attending school when she arrives, I have been looking for a way to supplement my income and help support my family. So I began looking into mining again and after weeks of research, decided to build my very first 6 GPU mining rig.
There are a lot of great websites, blog sites, etc. with information about mining, but as a beginner, I was unable to find one really good site that provided most of the information needed to get into or in my case, back into mining.
This blog is going to follow my journey into building my first 6 GPU rig and I will provide you with all the information I can to help you build your first 6 GPU rig as well. I will cover everything from purchasing, setting up and configuring your rig, to the various types of coins out there, type of wallets available and anything else pertinent. This is a learning process for me as well, so bear with me :)
There are many websites and forums out there that provide detailed and in-depth information on just about any aspect of mining you could think of, but that's not my intent here. My intent is to build my first 6 GPU mining rig and to document the process so that I can help others out there build their first rig as well.
I truly hope you enjoy this blog and that it helps you in your new "hobby" :)
Friday, August 25, 2017
Some mining basics
Okay, so if reading this, you're probably like me... You've read about mining, maybe you did a little mining in the past, you've been seeing website all over talking about Ethereum, Monero, etc. Whatever the reason, you most likely did enough research that you're interested in getting into mining and are looking for an informative place to start.
Bitcoin is the main cryptocurrency and several years ago, you were able to to mine Bitcoin using the video card(s) in your gaming rig. Unfortunately, the difficulty of mining has increased to the point where using video cards is no longer feasible. As the difficulty of mining Bitcoin has increased, the hash rates that video cards can produce, coupled with the cost of the hardware needed and electricity costs, you would not be able to earn a profit.
So now comes in Ethereum (ETH). This is a highly popular coin that you have probably read about quite a bit and most likely one of the reasons that brought you here. The current price of Ethereum is $323.71 Ethereum is very popular and probably one of the most mined coins currently behind Bitcoin. There are quite a few coins you can mine with GPU's; Ethereum, Ripple, Litecoin, Monero, Dash and ZCash to name a few.
With my setup, I'm planning on mining Ethereum, Zcash or most likely, a combination of the two. As time goes on and the market and crypto values change, that will be subject to change.
Thursday, August 24, 2017
Choosing the best GPU mining hardware for you.
Okay, so now we will discuss choosing the hardware for your mining rig.
Here is the build list that I came up with after my research and the prices I paid for them on 8/22/17 to give you an idea of prices at that time. After the build list, I'll go into more detail on each item and also give you recommended alternatives in case these are out of stock at the time.
Please note that all the links are from the products I purchased. Everything other than the open air case and SSD with EthOS loaded and configured, was ordered from Amazon and there are two main reasons why. The first being that due to the rush, there's a big shortage of hardware. Amazon supplies parts from several sellers and I've had better luck finding my components in stock on Amazon, than elsewhere. And the second, Amazon does not limit your purchases due to low stock, whereas other online retailers do. I was able to buy 6 GTX 1070's in one order, where at other sites, the video cards were limited to one or two per customer. Also, I'm an Amazon Prime member and free 2 day shipping rocks! :) Here in the US, there are two main places that I go to for my build components, they are Amazon and NewEgg.
GPU's
The first and most important decision is going to be what kind of video cards are you going to purchase for your new rig. As you probably know, there are two main types of cards that you can use, AMD and NVIDIA.
The first factor that is going to affect your purchase, is the availability of the cards. Due to a huge rush of people getting into mining the past several months, the prices of both cards have gone sky high... Regardless of which type of card you're interested in, expect to pay a premium and have difficulty finding the card in stock.
The most popular cards from each AMD and NVIDIA are:
1. AMD - MSI Radeon RX 580 Gaming X 8G
2. NVIDIA - EVGA GeForce GTX 1070 SC GAMING ACX 3.0, 8GB
or the MSI Gaming GeForce GTX 1070 8GB
Each card has it's strengths as to what type of Cryptocurrency it's better suited at for mining. The AMD cards have been the card of choice for Ethereum as they were priced well and hash at about 30 MH when overclocked properly.
The NVIDIA GTX 1070 is built on the NVIDIA Pascal GPU which hashes at around 30 MH as well, this is the first NVIDIA card that has hashed at a rate close/equal to the AMD Radeons. There are two important factors to take into consideration: First, the price. The GTX 1070 currently sells for approximately $100 more than the RX 580. Second, the GTX 1070 is more efficient, using approximately 100 Watts while hashing whereas the RX 580 will use 25% to 75% more depending on how they are overclocked. Depending on where you live and the cost of electricity, it may be a big factor for you when deciding which card to purchase. I've read several posts from miners who live or have access to "free electricity", whether it be in the apartment or office space! Now if I were only so lucky :)
One thing I would like to point out is that both the AMD and NVIDIA cards come in 4gb and 8gb versions. With the increasing hash rates on all coins, do yourself a favor and purchase only 8gb cards if at all possible. Ethereum for example uses a DAG file which is loaded by the GPU memory when hashing and it's expected to hit 3gb by early next year and eventually 4gb, etc... when it does, the lower memory cards will not be usable. Spend the extra money and future proof your rig as much as you can right now. The 4 gb versions may be good for another year, two, or more. But I would rather spend a little more now, than have to replace all my cards in the future due to memory limitations.
For my rig, I decide to go with the EVGA GeForce GTX 1070 SC GAMING ACX 3.0, 8GB cards. I've been building custom gaming computers for 20 plus years and have always had good experiences with EVGA cards as they seem well designed and made. And from what I've read on the forums, a lot of people agree. I was lucky and found them in stock 2 days ago and purchased 6 of them. I was expecting to buy two at a time until I had a full 6 for my rig. Newegg will limit high demand items while Amazon typically allows you to buy as many as you like. Right now, it's a hit or miss game of who has what in stock.
Motherboard
There are a variety of motherboards out there that will work with a 6 GPU setup. After my research, I decided on a Biostar TB250-BTC Core i7/i5/i3 LGA1151 Intel B250. In my gaming rigs, I'm a die hard Asus fan, but this is not a gaming rig :) The Biostar TB250 was designed for mining and has a great reputation in the mining community. It includes a "Mining mode" that is available when you use 6 GPU's, or 12! Yes, this board can support 12 cards if that's something you might be interested in.
Processor
As far as the processor goes, basically you want to choose a compatible CPU for your board and you can choose one of the lower end processors as the GPU's are doing all the work and you're processor will be used primarily for the OS. My choice was the Intel BX80677G3930 7th Generation Celeron.
Memory
Again, the memory in your system will be used primarily for the OS. You can go as low as 4 Gb, but I opted for 8 Gb. For the price of memory these days, I didn't see a reason not to. It may help to future proof your rig and when I add 2 sticks of memory, I prefer them to be from a kit. My choice was the Kingston HyperX Fury 8GB Kit.
As an update, if you're going to be running Windows 10 64 bit, purchase 8GB ram at a minimum, 16 would be ideal for future proofing. I am only running 8, which is sufficient, but will upgrade to 16.
Hard drive and Operating System
Depending on your rig, number of GPU's and computer proficiency, you have several choices and I'll explain each.
120GB SSD, which I have added to my build list.
Update*** Okay, so now I have used both ethOS and Windows 10. Here's my experience with both:
ethOS - Works great and everything is included in the $49. It's simple to configure (if you use my steps below) and has been rock solid for me so far. I'm mining at over 190MH using ethOS. There was a learning curve for me, but again, it's simple, it works and I've had no down time yet.
Windows 10 - Great for mining a variety of altcoins as most of the coins have windows based miners and if not, configurations and guides for using ccminer, ethminer, etc... to mine just about whatever you like. Now I made a learning mistake I want to point out - get a larger hard drive; 250GB minimum, 500GB recommended. I started with a 120GB as I was trying to keep unneeded costs down. The problem is that if you're going to solo mine, you're going to be downloading block chains... and they can be rather large. For example, the ethereum block chain is approximately 40GB right now. So while 120GB would be enough for Windows and a block chain or two, over time, you're going to end up with multiple block chains for multiple wallets and you're going to run out of space.
My recommendation is to buy both an ethOS drive for $49 and a larger SSD for Windows. This way, you can set up the ethOS drive for ethereum, Zcash, etc... and use the Windows for other coins. I'm a techie, so I enjoy tinkering and have set up ethereum on the Windows drive as well. So if you want to mine ethereum or Zcash for a bit, install the ethOS drive. If you want to mine something different or set up multiple coins in Windows, plug in the Windows drive. I like knowing I have a solid performing drive I can plug in at any time if Windows is giving me problems :)
Power supply
For your supply there are basically two options: a 1200 Watt or 1300 Watt. Power supplied come in 4 different certifications which are bronze, silver, gold and platinum. The certification relates to the efficiency at typical loads. You want to avoid bronze and silver (unless you're one of those lucky ones who does not pay for electricity) and look for a gold or platinum. Most people are using 1300's, which also make them difficult to come by. Also, you want to try to keep your load at or around 80% of max load for full efficiency. Estimating the GTX 1070's at 100w each and then including the mother board and cpu, I'm expecting my rig to run at or below 800w. So I decided on a 1200w Platinum EVGA psu. At 800w, that would put me at 66% of max rating and leave room in case I want to add another card. If you go the AMD RX 570/580 GPU's, you will need two power supplies to power your rig. So by going with the GTX, while I have higher cost initially, I'm saving on only needed one power supply. I purchased the EVGA SuperNoVA 1200 P2 80+ Platinum which is rated at 92% or higher efficiency under a typical load.
PCI-E Risers
PCI-E risers are needed to connect your GPU's to the mother board. While the motherboards have enough PCI-E slots, there is not enough physical room to put 6 video cards side by side on the board. These risers connect the video card to the mother board via a cable. I choose the MintCell 6-Pack PCIe 16x to 1x Powered Riser Adapter Card. This comes with 6 risers, enough for each card and have a very good reputation.
ATX Power switch
You can short out pins on the motherboard to restart your rig, but I'd rather not be playing around and shorting pins to restart my rig. For the $6, buy a Electop 2 Pack 2 Pin SW PC Push Button Switch.
Case screws
Pretty self explanatory. These are used to the mount the motherboard, risers and GPU's to your case. If you have built pc's over the years, you probably have a container full of them... but I didn't want to go digging through everything to look for them. So spend the $11 bucks and buy both... there's enough here for several rigs if you decide to expand.
Now with all of the miners out there building 6 GPU mining rigs, I thought it would have been easy to find a good open air case... boy, was I wrong! Honestly, I spent more time researching cases than I did all of the other components. You wouldn't believe how poorly designed the existing cases are and it seems like 99% of them come from China, Japan and other locales overseas. The last thing I want to do is have my components ready for my build out only to find out it's going to take another week or two for the case to arrive. And then... when it arrives, find out the quality is extremely poor.
My requirements for a case are simple... I want a well built, sturdy case. I also want a case where I can move it if need be. Meaning, unplugging the network cable and power cord, pick it up and move it. There are all sorts of cases being advertised and sold... most of them are made out of thin sheet metal, sheet metal and wood, plexiglass, etc... After more hours than I care to admit, I finally found a case that I'm excited about. It's made out of heavy duty aluminum square tubing, had a great design and fits my portable requirement where I can unplug it and move it. While doing my research, I've read so many articles/posts where a miner had a component come loose and fall and short out the GPU, riser or even the motherboard! Do yourself a favor and whatever you do, please... please... buy a quality case and protect your investment. If you skimp here and buy a lower quality case and god forbid, lost a $400+ card or motherboard, you'll be kicking yourself in the butt for a long time... $200 or so to protect your $3,000 plus investment is worth every penny and more. Remember, once you're up and running, any downtime will cost you money on top of the cost and time it takes to order and get a replacement component.
Another huge plus is that the case is built in the US and shipping times are typical. No waiting for 2-3 weeks, paying high shipping charges to receive a case your not happy with. I spoke with the vendor several times and he is working out a 10% discount for our readers, which will be posted soon, if it hasn't by the time you are reading this. Here is the case I purchase and I'm truly excited about it :) Parallel Miner Barebone Aluminum 6.1 GPU Open Air Mining Case. e Joseph from Parallelmining is offering a 10% discount to all readers here. The discount can be obtained by entering code 030964 when ordering. Thanks Joseph!
My parts have all been ordered and are in transit. As soon as they all arrive, I'll be doing a step-by-step blog showing you how to set up your hardware! I want you to be able to follow my guide and be able to build your rig without needing to go elsewhere :)
Recommended hardware list:
Okay, so now I have listed my hardware, I want to list alternatives in the event some of the hardware is not available at the time you decide to order your gear.
Below is list of my hardware as well as alternative hardware which I considered and is the same class and highly used by other miners. I'm going to provide actual links as well to both Amazon and Newegg for your convenience. This way you can click the links and check on the specific item, rather than having to search at each site. The first link in each category will be the component I decided on and purchase and the following links are other components that are highly recommended in the mining community, known to work and components that I researched and considered before making a final decision.
Here is a list of the components I am using and also a list of alternatives. The first component in each list is the item I finally decided on and purchase. There are a lot of popular components out there; but this is a list is of recommendations from the research I have done and the components I was initially considering. YMMV :)
This list is a link to the parts at Amazon.com
GPU's:
Processor:
PCI-E Risers:
Case screws:
Case:
Here is the build list that I came up with after my research and the prices I paid for them on 8/22/17 to give you an idea of prices at that time. After the build list, I'll go into more detail on each item and also give you recommended alternatives in case these are out of stock at the time.
- GPU's - EVGA GeForce GTX 1070 SC GAMING ACX 3.0, 8GB GDDR5, LED, DX12 OSD Support (PXOC) Graphics Card 08G-P4-6173-KR Qty 6 - $444 each.
- Motherboard - Biostar TB250-BTC Core i7/i5/i3 LGA1151 Intel B250 DDR4 SATA PCI Express USB ATX Retail - $113
- Processor - Intel BX80677G3930 7th Gen Celeron $43
- Memory -
- Hard drive
- SSD - EthosDistro 16gb with EthOS installed - $49
- SSD - Samsung 850 EVO 500 GB SSD - with a Windows 10 64 bit install - $139
- Power supply - EVGA SuperNoVA 1200 P2 80+ Platinum - $270
- PCI-E Risers - MintCell 6-Pack PCIe 16x to 1x Powered Riser Adapter Card - $49
- ATX power switch - Electop 2 Pack 2 Pin SW PC Push Button Switch - $6
- Case screws
- Motherboard - PC Mounting screws - $5
- Risers and GPU - Maxmoral 100pcs Toothed Hex 6/32 SCREW - $6
- Case - Parallel Miner Barebone Aluminum 6.1 GPU Open Air Mining Case - $198
- Parallel Miner has offered the readers of this blog a 10% discount. The discount can be obtained by using code 030964 when ordering. Please read the section below on cases as I believe your choice in a case is as important as the GPU's you use and I go into more detail there.
Total cost for build: $3688
A couple of months ago, I could have build the same mining rig for $1,000 less... and with the market changing on a daily basis and the speculated changes coming in the future, some will say I'm crazy to spend that much to get into mining right now. As I said earlier, I mined a bit of Bitcoin several years ago and regret getting out then... So I'm taking a leap of faith and hoping that I'll at least see a ROI in at least 10 months. Maybe more, maybe less... it all depends on the market. And I feel there will always be alt coins to mine. Hopefully my rig is future proofed enough that I'll be in the game for a while. *fingers crossed* Either way, it will be an interested journey :) And if it all goes belly up (which I doubt) at least I have top end gaming cards to recoup some of my losses with :)
So now on to the hardware!
Please note that all the links are from the products I purchased. Everything other than the open air case and SSD with EthOS loaded and configured, was ordered from Amazon and there are two main reasons why. The first being that due to the rush, there's a big shortage of hardware. Amazon supplies parts from several sellers and I've had better luck finding my components in stock on Amazon, than elsewhere. And the second, Amazon does not limit your purchases due to low stock, whereas other online retailers do. I was able to buy 6 GTX 1070's in one order, where at other sites, the video cards were limited to one or two per customer. Also, I'm an Amazon Prime member and free 2 day shipping rocks! :) Here in the US, there are two main places that I go to for my build components, they are Amazon and NewEgg.
GPU's
The first and most important decision is going to be what kind of video cards are you going to purchase for your new rig. As you probably know, there are two main types of cards that you can use, AMD and NVIDIA.
The first factor that is going to affect your purchase, is the availability of the cards. Due to a huge rush of people getting into mining the past several months, the prices of both cards have gone sky high... Regardless of which type of card you're interested in, expect to pay a premium and have difficulty finding the card in stock.
The most popular cards from each AMD and NVIDIA are:
1. AMD - MSI Radeon RX 580 Gaming X 8G
2. NVIDIA - EVGA GeForce GTX 1070 SC GAMING ACX 3.0, 8GB
or the MSI Gaming GeForce GTX 1070 8GB
Each card has it's strengths as to what type of Cryptocurrency it's better suited at for mining. The AMD cards have been the card of choice for Ethereum as they were priced well and hash at about 30 MH when overclocked properly.
The NVIDIA GTX 1070 is built on the NVIDIA Pascal GPU which hashes at around 30 MH as well, this is the first NVIDIA card that has hashed at a rate close/equal to the AMD Radeons. There are two important factors to take into consideration: First, the price. The GTX 1070 currently sells for approximately $100 more than the RX 580. Second, the GTX 1070 is more efficient, using approximately 100 Watts while hashing whereas the RX 580 will use 25% to 75% more depending on how they are overclocked. Depending on where you live and the cost of electricity, it may be a big factor for you when deciding which card to purchase. I've read several posts from miners who live or have access to "free electricity", whether it be in the apartment or office space! Now if I were only so lucky :)
One thing I would like to point out is that both the AMD and NVIDIA cards come in 4gb and 8gb versions. With the increasing hash rates on all coins, do yourself a favor and purchase only 8gb cards if at all possible. Ethereum for example uses a DAG file which is loaded by the GPU memory when hashing and it's expected to hit 3gb by early next year and eventually 4gb, etc... when it does, the lower memory cards will not be usable. Spend the extra money and future proof your rig as much as you can right now. The 4 gb versions may be good for another year, two, or more. But I would rather spend a little more now, than have to replace all my cards in the future due to memory limitations.
For my rig, I decide to go with the EVGA GeForce GTX 1070 SC GAMING ACX 3.0, 8GB cards. I've been building custom gaming computers for 20 plus years and have always had good experiences with EVGA cards as they seem well designed and made. And from what I've read on the forums, a lot of people agree. I was lucky and found them in stock 2 days ago and purchased 6 of them. I was expecting to buy two at a time until I had a full 6 for my rig. Newegg will limit high demand items while Amazon typically allows you to buy as many as you like. Right now, it's a hit or miss game of who has what in stock.
Motherboard
There are a variety of motherboards out there that will work with a 6 GPU setup. After my research, I decided on a Biostar TB250-BTC Core i7/i5/i3 LGA1151 Intel B250. In my gaming rigs, I'm a die hard Asus fan, but this is not a gaming rig :) The Biostar TB250 was designed for mining and has a great reputation in the mining community. It includes a "Mining mode" that is available when you use 6 GPU's, or 12! Yes, this board can support 12 cards if that's something you might be interested in.
Processor
As far as the processor goes, basically you want to choose a compatible CPU for your board and you can choose one of the lower end processors as the GPU's are doing all the work and you're processor will be used primarily for the OS. My choice was the Intel BX80677G3930 7th Generation Celeron.
Memory
Again, the memory in your system will be used primarily for the OS. You can go as low as 4 Gb, but I opted for 8 Gb. For the price of memory these days, I didn't see a reason not to. It may help to future proof your rig and when I add 2 sticks of memory, I prefer them to be from a kit. My choice was the Kingston HyperX Fury 8GB Kit.
As an update, if you're going to be running Windows 10 64 bit, purchase 8GB ram at a minimum, 16 would be ideal for future proofing. I am only running 8, which is sufficient, but will upgrade to 16.
Hard drive and Operating System
Depending on your rig, number of GPU's and computer proficiency, you have several choices and I'll explain each.
- Windows 7 - Please note that Windows 7 only supports up to 4 GPU's. So if you're using 4 or less GPU''s, this is an option. There are also registry tweaks you can do to make it support 6, but I prefer native support. You can use an SSD or HDD with enough space for the Windows install.
- Windows 10 64-bit - Windows 10 64-bit supports 6 GPU's and there are multiple software packages that you can use on Windows 10 64-bit for mining. If you go this route, make sure you disable automatic updates to prevent your rig from patching and rebooting. I recommend a 250GB SSD at the very minimum, with a 500GB recommend. I'll go into configuration and tweaking of Windows 10 in a later section. You need the 64-bit Windows 10 as the ethereum and other mining software will not run on 32-bit.
- Linux/Ubuntu - This will depend on your knowledge of the OS and can be used on an SSD.
- EthOS - You can purchase a 16gb SSD with EthOS installed and configured. It can be used to mine Ethereum, ZCash, Monero and other coins. It's $49, comes with the SSD and license here: EthosDistro.
Update*** Okay, so now I have used both ethOS and Windows 10. Here's my experience with both:
ethOS - Works great and everything is included in the $49. It's simple to configure (if you use my steps below) and has been rock solid for me so far. I'm mining at over 190MH using ethOS. There was a learning curve for me, but again, it's simple, it works and I've had no down time yet.
Windows 10 - Great for mining a variety of altcoins as most of the coins have windows based miners and if not, configurations and guides for using ccminer, ethminer, etc... to mine just about whatever you like. Now I made a learning mistake I want to point out - get a larger hard drive; 250GB minimum, 500GB recommended. I started with a 120GB as I was trying to keep unneeded costs down. The problem is that if you're going to solo mine, you're going to be downloading block chains... and they can be rather large. For example, the ethereum block chain is approximately 40GB right now. So while 120GB would be enough for Windows and a block chain or two, over time, you're going to end up with multiple block chains for multiple wallets and you're going to run out of space.
My recommendation is to buy both an ethOS drive for $49 and a larger SSD for Windows. This way, you can set up the ethOS drive for ethereum, Zcash, etc... and use the Windows for other coins. I'm a techie, so I enjoy tinkering and have set up ethereum on the Windows drive as well. So if you want to mine ethereum or Zcash for a bit, install the ethOS drive. If you want to mine something different or set up multiple coins in Windows, plug in the Windows drive. I like knowing I have a solid performing drive I can plug in at any time if Windows is giving me problems :)
Power supply
For your supply there are basically two options: a 1200 Watt or 1300 Watt. Power supplied come in 4 different certifications which are bronze, silver, gold and platinum. The certification relates to the efficiency at typical loads. You want to avoid bronze and silver (unless you're one of those lucky ones who does not pay for electricity) and look for a gold or platinum. Most people are using 1300's, which also make them difficult to come by. Also, you want to try to keep your load at or around 80% of max load for full efficiency. Estimating the GTX 1070's at 100w each and then including the mother board and cpu, I'm expecting my rig to run at or below 800w. So I decided on a 1200w Platinum EVGA psu. At 800w, that would put me at 66% of max rating and leave room in case I want to add another card. If you go the AMD RX 570/580 GPU's, you will need two power supplies to power your rig. So by going with the GTX, while I have higher cost initially, I'm saving on only needed one power supply. I purchased the EVGA SuperNoVA 1200 P2 80+ Platinum which is rated at 92% or higher efficiency under a typical load.
PCI-E Risers
PCI-E risers are needed to connect your GPU's to the mother board. While the motherboards have enough PCI-E slots, there is not enough physical room to put 6 video cards side by side on the board. These risers connect the video card to the mother board via a cable. I choose the MintCell 6-Pack PCIe 16x to 1x Powered Riser Adapter Card. This comes with 6 risers, enough for each card and have a very good reputation.
ATX Power switch
You can short out pins on the motherboard to restart your rig, but I'd rather not be playing around and shorting pins to restart my rig. For the $6, buy a Electop 2 Pack 2 Pin SW PC Push Button Switch.
Case screws
Pretty self explanatory. These are used to the mount the motherboard, risers and GPU's to your case. If you have built pc's over the years, you probably have a container full of them... but I didn't want to go digging through everything to look for them. So spend the $11 bucks and buy both... there's enough here for several rigs if you decide to expand.
- Motherboard - PC Mounting screws - $5
- Risers and GPU - Maxmoral 100pcs Toothed Hex 6/32 SCREW - $6
Now with all of the miners out there building 6 GPU mining rigs, I thought it would have been easy to find a good open air case... boy, was I wrong! Honestly, I spent more time researching cases than I did all of the other components. You wouldn't believe how poorly designed the existing cases are and it seems like 99% of them come from China, Japan and other locales overseas. The last thing I want to do is have my components ready for my build out only to find out it's going to take another week or two for the case to arrive. And then... when it arrives, find out the quality is extremely poor.
My requirements for a case are simple... I want a well built, sturdy case. I also want a case where I can move it if need be. Meaning, unplugging the network cable and power cord, pick it up and move it. There are all sorts of cases being advertised and sold... most of them are made out of thin sheet metal, sheet metal and wood, plexiglass, etc... After more hours than I care to admit, I finally found a case that I'm excited about. It's made out of heavy duty aluminum square tubing, had a great design and fits my portable requirement where I can unplug it and move it. While doing my research, I've read so many articles/posts where a miner had a component come loose and fall and short out the GPU, riser or even the motherboard! Do yourself a favor and whatever you do, please... please... buy a quality case and protect your investment. If you skimp here and buy a lower quality case and god forbid, lost a $400+ card or motherboard, you'll be kicking yourself in the butt for a long time... $200 or so to protect your $3,000 plus investment is worth every penny and more. Remember, once you're up and running, any downtime will cost you money on top of the cost and time it takes to order and get a replacement component.
Another huge plus is that the case is built in the US and shipping times are typical. No waiting for 2-3 weeks, paying high shipping charges to receive a case your not happy with. I spoke with the vendor several times and he is working out a 10% discount for our readers, which will be posted soon, if it hasn't by the time you are reading this. Here is the case I purchase and I'm truly excited about it :) Parallel Miner Barebone Aluminum 6.1 GPU Open Air Mining Case. e Joseph from Parallelmining is offering a 10% discount to all readers here. The discount can be obtained by entering code 030964 when ordering. Thanks Joseph!
My parts have all been ordered and are in transit. As soon as they all arrive, I'll be doing a step-by-step blog showing you how to set up your hardware! I want you to be able to follow my guide and be able to build your rig without needing to go elsewhere :)
Recommended hardware list:
Okay, so now I have listed my hardware, I want to list alternatives in the event some of the hardware is not available at the time you decide to order your gear.
Below is list of my hardware as well as alternative hardware which I considered and is the same class and highly used by other miners. I'm going to provide actual links as well to both Amazon and Newegg for your convenience. This way you can click the links and check on the specific item, rather than having to search at each site. The first link in each category will be the component I decided on and purchase and the following links are other components that are highly recommended in the mining community, known to work and components that I researched and considered before making a final decision.
Here is a list of the components I am using and also a list of alternatives. The first component in each list is the item I finally decided on and purchase. There are a lot of popular components out there; but this is a list is of recommendations from the research I have done and the components I was initially considering. YMMV :)
This list is a link to the parts at Amazon.com
GPU's:
- EVGA GeForce GTX 1070 SC GAMING ACX 3.0, 8GB
- MSI Gaming GeForce GTX 1070 8GB
- Asus GeForce GTX 1070 8GB
- ASUS GeForce GTX 1070 8GB ROG STRIX
- Gigabyte GeForce GTX 1070 G1 Gaming 8GB
- MSI Gaming GeForce GTX 1070 8GB
- MSI Gaming GeForce GTX 1070 8GB Armor
Processor:
- As far as the processor goes, remember, you want to minimize the watts used by your rig, so a simple Celeron CPU is fine as the hashing is done on your video cards. Get a Celeron that is compatible with your motherboard. The boards recommended have an LGA 1150 or LGA 1151 socket. Make sure pick a CPU that is compatible with your board.
- You can get away with 4 Gb of ram, but with the low price of RAM these days, go for 8 Gb and buy a kit to future proof your rig a little. Just make sure the timing is compatible with your motherboard of choice.
- EthosDistro 16gb SSD with EthOS installed. (Includes license)
If you're going to with a Windows 10 build, here are three good drives. Remember, you'll have to add the cost of a Windows license in if you don't already have one. - Samsung 850 EVO 500 GB SSD
- Western Digital Blue 500Gb
PCI-E Risers:
- MintCell 6-Pack PCIe 16x to 1x Powered Riser Adapter Card
- VICTONY 6-Pack PCIe 16X TO 1Z Powered Riser Adapter
Case screws:
Case:
- Barebone Aluminum 6.1 GPU Open Air Mining Case- As I stated earlier, this case seems to be the best available. It's one area I don't want to skimp on and I want a sturdy, well made case and I believe this is the best of the options out there. Parallel Miner has offered the readers of this blog a 10% discount. The discount can be obtained by entering code 030964 when ordering. Thanks Joseph!
Wednesday, August 23, 2017
Assembling your 6 GPU NVidia GTX 1070 mining rig :)
Wednesday, September 30th 2017
Okay, so all the parts have arrived and now it's time to start building!
1. Case:


I have to say that I'm very impressed with this open air case! It arrived well packed and in two pieces that needed to be snapped together. Everything about it says quality... The standoffs were placed perfectly, the tapped holes for the risers and GPU's were tapped well and placed well. This case lived up to everything I had hoped for. It's very sturdy and one of the best aspects, portable. I actually brought this rig to work to test some configurations and had it on it's side, back, etc.. and nothing budged. Can't recommend Parallelminer and their Barebone Aluminum 6.1 GPU Open Air Mining Case enough!
2. Motherboard

The motherboard gets mounted on the 6 brass standoff's using the hardware. Place the back of the motherboard towards the back of the case (high side).
3. CPU and CPU heatsink/fan:
*** Please note that there is thermal grease on the underside of the CPU fan. Don't touch it when you take it out of the box as it wipes off fairly easily! This grease helps the heat transfer from the CPU to the heatsink.


Insert the CPU fan power lead into the CPU fan plug on the motherboard.
4. Memory:

There is a tab in the middle of the memory slot that is off center. You'll have a cutout in your DIMM as well. Make sure you line these up when installing the memory. Push the tabs on both ends out (away from the slot), put one corner of the DIMM in the slot and gently push the DIMM down. Watch as you push it down to make sure it's lined up correctly. Once it is, push firmly and the DIMM will snap down and the two tabs on each end will snap back in place and secure the DIMM.
5. Power supply

The first you're going to do is mount the motherboard to the case using the screws supplied with the power supply as shown in the photo above. You will only be using two screws.

The next step will be using the 24/28 pin cable to connect the power supply to the motherboard.

CPU power cable:

The next step is to connect the CPU power cable to the power supply.

And then connect the other end of the CPU power cable to the PSU power connector on the motherboard.
6: Hard drive:
There are no screws for the hard drive. The case is configured for two power supplies if needed, since only one is used, you can place the hard drive on the front left corner. I'll eventually tie wrap it down, but for now it's just laying in place; the sata and power cables are stiff enough that it doesn't move around.

First, connect the SSD hard drive to the sata one connector on the motherboard using the supplied sata cable. You can use any sata port, I preferred to use 1.
Then connect the hard drive to the to power supply using a power supply cabled marked SATA.
7: Power switch:

Connect the power switch to the two power pins on the motherboard as shown in the photo. It doesn't matter which way it goes length wise. Red or black can be on the first pin.
8: Riser

So now we have to mount the riser. I do want to point out the the risers come with a nice thick foam type backing to prevent them from shorting out. And the holes in the risers were a little tight for the screws, so I used a 9/64th drill bit to ream the holes out and to make a hole in the foam backing for the screw to pass through.

Once you have the riser mounted to the case, you can connect the power cable and the riser connector (blue wire).


Now you can do this two ways, you can insert the adapter card into the PCI-E slot and then connect the blue riser cable. After the first one, I ended up connecting the adapter card to the riser cable first and then inserting it into the PCI-E slot.
The next step is to connect a power supply SATA cable to the power supply and the other end to the power connector running off the riser board.
***One thing to note. Typically, the PCI-E slot closest to the CPU is slot 1, which is where I began. I connected the HDMI cable to this card to monitor the boot process, which was fine. But once I installed the second in the PCI-E x16 slot (the long yellow slot), EthOS yelled at me and said that the monitor needed to be installed on the video card in the first slot. So I'm assuming on this board, the PCI-E x16 is slot one, so you may want to start there or you will need to move your HDMI cable as I did. Not a big deal, just pointing it out.
9: GPU:

*** This may sound silly, but please remove the protective plastic from BOTH sides of the video card. Again, silly... but trying to be thorough :)

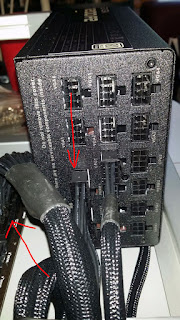
The next step to connect the video card to the power supply using one of the power supply cables marked GPU. Sorry, the one I had with just one video card was blurry, so this will have to suffice :)

The next step is very important. When first powering on your rig, as soon as it comes on, hit F-9 (on most motherboards, if not yours, see your manual) to enter the bios setup. What you want to do, is look for a setting that determines what your computer will do after a power loss. What this means is that if your rig is up and running and the power goes out, causing your rig to power off, what will it do after the power is restored. You want your rig to automatically turn back on, so change the "Restore AC Power Loss " to Power On.

***Please note - When ethOS loads, it will show you the IP address it obtained from your router. Please write this down as you will need it later to configure ethOS. This will be done from a Windows machine on the same network.
At this point, you can connect your monitor via an HDMI cable to the video card, a network cable to the RJ-45 connector and USB keyboard to a USB port in the back of the computer.
At this point, you can connect your monitor via an HDMI cable to the video card and a USB keyboard to a USB port in the back of the computer.
So now that you have your first video card completely connected, you can turn on your rig! I did take pictures of the ethOS screen showing 1 video card connected, but they were too blurry... so using this one as an example.
Now that you have it up and running and your first video card is detected, you will repeat the process for the remaining video cards! You can install the remaining video cards and then power on your system to see if they are all recognized, but I shut down and powered on my rig after each card to make sure each one was recognized before moving on to the next. Makes any needed troubleshooting easier.
2 GPU's


3 GPU's


4 GPU's

5 GPU's


And finally, 6 GPU's!


The first time I brought the rig up, all 6 video cards were recognized and when it started mining, they were averaging 27-27.8 Mh's.
190 hash rate:

After configuring EthOS properly, you can see I'm now running at over 31Mh's per video card and a total over 190 plus Mh's.
I'll go over setting up and the optimal settings for the GTX 1070's using EthOS in the next section!
Okay, so all the parts have arrived and now it's time to start building!
1. Case:


I have to say that I'm very impressed with this open air case! It arrived well packed and in two pieces that needed to be snapped together. Everything about it says quality... The standoffs were placed perfectly, the tapped holes for the risers and GPU's were tapped well and placed well. This case lived up to everything I had hoped for. It's very sturdy and one of the best aspects, portable. I actually brought this rig to work to test some configurations and had it on it's side, back, etc.. and nothing budged. Can't recommend Parallelminer and their Barebone Aluminum 6.1 GPU Open Air Mining Case enough!
2. Motherboard

The motherboard gets mounted on the 6 brass standoff's using the hardware. Place the back of the motherboard towards the back of the case (high side).
3. CPU and CPU heatsink/fan:
*** Please note that there is thermal grease on the underside of the CPU fan. Don't touch it when you take it out of the box as it wipes off fairly easily! This grease helps the heat transfer from the CPU to the heatsink.

You're
going to push the lever down and gently away from the CPU socket . Once
it's removed from the clip, lift it up and insert the CPU. Please note
the marks on the motherboard and CPU to make sure you line up the
processor correctly (see photo). Bent pins are not fun. Once the CPU is
installed, gently lower the and lock the lever to secure the CPU.


Once
you have the CPU installed, place the CPU fan on top with enough slack
to install the fan power connector to the mother board. Once in place,
push down on each of the plastic inserts. They will snap into place and
secure the CPU fan on top of the CPU.

Insert the CPU fan power lead into the CPU fan plug on the motherboard.
4. Memory:

There is a tab in the middle of the memory slot that is off center. You'll have a cutout in your DIMM as well. Make sure you line these up when installing the memory. Push the tabs on both ends out (away from the slot), put one corner of the DIMM in the slot and gently push the DIMM down. Watch as you push it down to make sure it's lined up correctly. Once it is, push firmly and the DIMM will snap down and the two tabs on each end will snap back in place and secure the DIMM.
5. Power supply

The first you're going to do is mount the motherboard to the case using the screws supplied with the power supply as shown in the photo above. You will only be using two screws.

The next step will be using the 24/28 pin cable to connect the power supply to the motherboard.


CPU power cable:

The next step is to connect the CPU power cable to the power supply.

And then connect the other end of the CPU power cable to the PSU power connector on the motherboard.
6: Hard drive:
There are no screws for the hard drive. The case is configured for two power supplies if needed, since only one is used, you can place the hard drive on the front left corner. I'll eventually tie wrap it down, but for now it's just laying in place; the sata and power cables are stiff enough that it doesn't move around.

First, connect the SSD hard drive to the sata one connector on the motherboard using the supplied sata cable. You can use any sata port, I preferred to use 1.
Then connect the hard drive to the to power supply using a power supply cabled marked SATA.
7: Power switch:

Connect the power switch to the two power pins on the motherboard as shown in the photo. It doesn't matter which way it goes length wise. Red or black can be on the first pin.
8: Riser

So now we have to mount the riser. I do want to point out the the risers come with a nice thick foam type backing to prevent them from shorting out. And the holes in the risers were a little tight for the screws, so I used a 9/64th drill bit to ream the holes out and to make a hole in the foam backing for the screw to pass through.

Once you have the riser mounted to the case, you can connect the power cable and the riser connector (blue wire).


Now you can do this two ways, you can insert the adapter card into the PCI-E slot and then connect the blue riser cable. After the first one, I ended up connecting the adapter card to the riser cable first and then inserting it into the PCI-E slot.
The next step is to connect a power supply SATA cable to the power supply and the other end to the power connector running off the riser board.
***One thing to note. Typically, the PCI-E slot closest to the CPU is slot 1, which is where I began. I connected the HDMI cable to this card to monitor the boot process, which was fine. But once I installed the second in the PCI-E x16 slot (the long yellow slot), EthOS yelled at me and said that the monitor needed to be installed on the video card in the first slot. So I'm assuming on this board, the PCI-E x16 is slot one, so you may want to start there or you will need to move your HDMI cable as I did. Not a big deal, just pointing it out.
9: GPU:

*** This may sound silly, but please remove the protective plastic from BOTH sides of the video card. Again, silly... but trying to be thorough :)

The next step to connect the video card to the power supply using one of the power supply cables marked GPU. Sorry, the one I had with just one video card was blurry, so this will have to suffice :)

The next step is very important. When first powering on your rig, as soon as it comes on, hit F-9 (on most motherboards, if not yours, see your manual) to enter the bios setup. What you want to do, is look for a setting that determines what your computer will do after a power loss. What this means is that if your rig is up and running and the power goes out, causing your rig to power off, what will it do after the power is restored. You want your rig to automatically turn back on, so change the "Restore AC Power Loss " to Power On.

***Please note - When ethOS loads, it will show you the IP address it obtained from your router. Please write this down as you will need it later to configure ethOS. This will be done from a Windows machine on the same network.
At this point, you can connect your monitor via an HDMI cable to the video card, a network cable to the RJ-45 connector and USB keyboard to a USB port in the back of the computer.
At this point, you can connect your monitor via an HDMI cable to the video card and a USB keyboard to a USB port in the back of the computer.
So now that you have your first video card completely connected, you can turn on your rig! I did take pictures of the ethOS screen showing 1 video card connected, but they were too blurry... so using this one as an example.
Now that you have it up and running and your first video card is detected, you will repeat the process for the remaining video cards! You can install the remaining video cards and then power on your system to see if they are all recognized, but I shut down and powered on my rig after each card to make sure each one was recognized before moving on to the next. Makes any needed troubleshooting easier.
2 GPU's


3 GPU's


4 GPU's

5 GPU's


And finally, 6 GPU's!


The first time I brought the rig up, all 6 video cards were recognized and when it started mining, they were averaging 27-27.8 Mh's.
190 hash rate:

After configuring EthOS properly, you can see I'm now running at over 31Mh's per video card and a total over 190 plus Mh's.
I'll go over setting up and the optimal settings for the GTX 1070's using EthOS in the next section!
Tuesday, August 22, 2017
Configuring ethOS with 6 NVidia GTX 1070 video cards for optimal hash rates. 31Mh/s plus per card, 190Mh/s plus per rig!
September 1st, 2017
We're going to be doing all our ethOS configuring from a Windows 7 pc. To connect to your rig, you'll need to download and install Putty.
It can be found her:

***Remember - When ethOS loads, it will show you the IP address it obtained from your router.
Now hit open and you will connect to your rig and will will see the following screen login screen:

The default login is "ethos" and the default password is "live". So enter both of those and you be at the ethOS splash screen as shown below:

So now your rig is up and running and it should be mining away. But wait, mining to where? We'll get there in a second :)
The first thing you are going to want to do is change the default password and secure your rig.
To do this, at the green prompt, type "passwd". You will be asked for the current password, which again, is "live" and hit enter. You will then be prompted to enter your new password. Enter your new password and hit enter. You will be prompted for your new password a second time. Enter your new password again and hit enter. Voila! The password has been changed and the next time you log in using Putty, you will use your new password.
Write this password down and store it in a safe place!!! Even if you think you will always remember it :)
So now you're back at the ethOS splash screen while your rig is mining away. Now, we have to change the local.conf file. This is the file that holds all of your settings.
To edit the local.conf file, you're going to need to use the built in Linux editor, vi. I spent several hours googling various commands and steps as I'm new to this as well. So I'm going to hold your hand and walk you through this so that I can hopefully save you some time :) It's actually very simple, unfortunately I wasn't able to find anything like this, lucky you!
Okay, so at the green prompt, you're going to type "vi" and hit enter.
You will then enter the vi editor. Every command in the vi editor begins with a colon " : " That's the key on the keyboard just to the right of the L :)
So the first thing you are going to do, is open the local.conf file. You do that by typing: ":e local.conf" . (E stands for edit) and you should see the screen below:

You can use the arrow keys on the keyboard to move the green cursor around. The first thing we want to do is change the default wallet address to your wallet address. So move the green cursor up to the 0 in the proxywallet line. Now to make changes, you have to enter the insert or as I refer to it, edit mode. So hit " i " on your keyboard and you should see "insert" pop up at the bottom of the screen. That tells you that you can now edit the file. So hit delete until the default address is gone and then enter your wallet address.
The next step is going to be to enter the pool address of the pool you are going to mine. This can be found on the pools main website, typically the first page :) Each pool has multiple server addresses and you're going to want to enter the addresses for the two servers closest to you. In the proxypool1 address, change that to the address and port of the closest server to your location. I decided that I'm going to mine in ethermine's pool and I'm on the east coast in the US, so I entered the address for their east coast server. Then you are going to delete and enter the address of the second closest server of the pool you decided on. The reason for entering two servers, is so that in the event one server is unavailable for whatever reason, ethOS will default to the second server. Hopefully both will not be down! :)
Okay, so now you have your wallet address entered as well as the two pool servers and after a reboot, your rig would begin mining and making you some coin! But wait... the important part comes next!
Optimizing your local.conf! With the default settings, you're video cards would hash at around 27MH's or so. That's good, but that's not good enough! We can get those cards to has at a rate of around 31MH'!
I spent a lot of time googling and testing different settings and finally came up with optimal settings for your GTX 1070 cards and we'll go over those now.
I did run into a really weird issue that I want to mention. In Linux, the # symbol is used to comment out a line. So if there is a # in front of the line, that means it is commented out and will not be read. Typically, you should be able to add any new values to the top of the file and be good to go. But that wasn't the case for me... I tried entering the values I wanted at the top of the file, but every time I did... I saw very little change or improvement. After troubleshooting the issue for a while, I found a remedy that worked for me. Instead of adding new lines at the top of the file, I ended up removed the # symbols in the lines that had the values I wanted in the Global Config section below.
So let's do that now and optimize our settings :) Follow these steps:
1. Towards the top, change globalfan from 85 to 90. *Update. Just found out that only temperature monitoring on NVidia cards is available. Any fan settings such as globalfan to adjust the fan speed do not work on NVidia currently.
Now we're going to go down to the commented out section and modify several lines.
2. Go to the line that says globalminer ethminer and remove the # at the beginning of the line. Honestly, I don't know if this makes a difference or not. It's on my things to research list :)
3. Go down to the line that says globalcore, remove the # symbol at the beginning and change the value from 1000 to 1750.
4. On the next line where it says globalmem, remove the # symbol at the beginning and change the value from 1250 to 5100.
5. Go to the line that says globalpowertune, remove the # symbol at the beginning and change the value from 20 to 7.
Here's a link to some basic vi editing commands if you're interested: Linux for Beginners - Editing files with vi
Okay, so now that the settings are changed, we need to save the file with the new settings. To do that, exit out of editing mode by hitting escape a couple of times. The "insert" at the bottom of the page should disappear.
After that, at the green prompt, you are going to type "wq", which is write and quit.
And voila, you're done! It took me hours to figure all this out and you were able to do it in 10 minutes, luck you! :)
In case you run into any trouble, I'm going to give you a very important command... " :q! " This is quit without saving changes. If you make a mistake, just quit without saving and you can go back into vi and start over.
Now you saved your local.conf and quit and your back at the black ethOS screen and your wondering what to do next :) The first thing you should do is type "update" and hit enter. In a couple of seconds, you'll be presented with a lot of neat and important information! Here's a screenshot of mine:

Here you can see some very useful information such as cpu temp, GPU temp which is the "temp" lines. My temps are shown as 57.00 49.00 42.00 56.00 51.00 and 52.00. I'm surprised to see such a difference in the temperatures between the cards. But as long as you stay under 75C, preferably 70C you should be fine. You can see my temps are way below and I'm very happy to see that! You'll also see your hash rate, mine was at 190.8 at the time :) Fan rpm's, gpu models and other related info.
Here are a couple of other commands you can use:
1. show miner - You can use the command show miner to see the actual mining process and hash rate of each card. To exit out of this screen hit "CTRL" and "C" at the same time. It's pretty cool to see the info here.
2. minestart and minestop will do just that. Stop the video cards from mining.
I'm sure there's more you can do, but you'll have to Google it, just like I will to find out :)
I really hope you found this guide useful and that you're rig is up and running and each card is mining away at 31MH's!
We're going to be doing all our ethOS configuring from a Windows 7 pc. To connect to your rig, you'll need to download and install Putty.
It can be found her:
Once you have Putty downloaded and installed, launch it. You will see the following screen:

You will enter the IP address of your rig, leave the port set to 22 and make sure connection type is set to SSH.
***Remember - When ethOS loads, it will show you the IP address it obtained from your router.
Now hit open and you will connect to your rig and will will see the following screen login screen:

The default login is "ethos" and the default password is "live". So enter both of those and you be at the ethOS splash screen as shown below:

So now your rig is up and running and it should be mining away. But wait, mining to where? We'll get there in a second :)
The first thing you are going to want to do is change the default password and secure your rig.
To do this, at the green prompt, type "passwd". You will be asked for the current password, which again, is "live" and hit enter. You will then be prompted to enter your new password. Enter your new password and hit enter. You will be prompted for your new password a second time. Enter your new password again and hit enter. Voila! The password has been changed and the next time you log in using Putty, you will use your new password.
Write this password down and store it in a safe place!!! Even if you think you will always remember it :)
So now you're back at the ethOS splash screen while your rig is mining away. Now, we have to change the local.conf file. This is the file that holds all of your settings.
To edit the local.conf file, you're going to need to use the built in Linux editor, vi. I spent several hours googling various commands and steps as I'm new to this as well. So I'm going to hold your hand and walk you through this so that I can hopefully save you some time :) It's actually very simple, unfortunately I wasn't able to find anything like this, lucky you!
Okay, so at the green prompt, you're going to type "vi" and hit enter.
You will then enter the vi editor. Every command in the vi editor begins with a colon " : " That's the key on the keyboard just to the right of the L :)
So the first thing you are going to do, is open the local.conf file. You do that by typing: ":e local.conf" . (E stands for edit) and you should see the screen below:

You can use the arrow keys on the keyboard to move the green cursor around. The first thing we want to do is change the default wallet address to your wallet address. So move the green cursor up to the 0 in the proxywallet line. Now to make changes, you have to enter the insert or as I refer to it, edit mode. So hit " i " on your keyboard and you should see "insert" pop up at the bottom of the screen. That tells you that you can now edit the file. So hit delete until the default address is gone and then enter your wallet address.
The next step is going to be to enter the pool address of the pool you are going to mine. This can be found on the pools main website, typically the first page :) Each pool has multiple server addresses and you're going to want to enter the addresses for the two servers closest to you. In the proxypool1 address, change that to the address and port of the closest server to your location. I decided that I'm going to mine in ethermine's pool and I'm on the east coast in the US, so I entered the address for their east coast server. Then you are going to delete and enter the address of the second closest server of the pool you decided on. The reason for entering two servers, is so that in the event one server is unavailable for whatever reason, ethOS will default to the second server. Hopefully both will not be down! :)
Okay, so now you have your wallet address entered as well as the two pool servers and after a reboot, your rig would begin mining and making you some coin! But wait... the important part comes next!
Optimizing your local.conf! With the default settings, you're video cards would hash at around 27MH's or so. That's good, but that's not good enough! We can get those cards to has at a rate of around 31MH'!
I spent a lot of time googling and testing different settings and finally came up with optimal settings for your GTX 1070 cards and we'll go over those now.
I did run into a really weird issue that I want to mention. In Linux, the # symbol is used to comment out a line. So if there is a # in front of the line, that means it is commented out and will not be read. Typically, you should be able to add any new values to the top of the file and be good to go. But that wasn't the case for me... I tried entering the values I wanted at the top of the file, but every time I did... I saw very little change or improvement. After troubleshooting the issue for a while, I found a remedy that worked for me. Instead of adding new lines at the top of the file, I ended up removed the # symbols in the lines that had the values I wanted in the Global Config section below.
So let's do that now and optimize our settings :) Follow these steps:
1. Towards the top, change globalfan from 85 to 90. *Update. Just found out that only temperature monitoring on NVidia cards is available. Any fan settings such as globalfan to adjust the fan speed do not work on NVidia currently.
Now we're going to go down to the commented out section and modify several lines.
2. Go to the line that says globalminer ethminer and remove the # at the beginning of the line. Honestly, I don't know if this makes a difference or not. It's on my things to research list :)
3. Go down to the line that says globalcore, remove the # symbol at the beginning and change the value from 1000 to 1750.
4. On the next line where it says globalmem, remove the # symbol at the beginning and change the value from 1250 to 5100.
5. Go to the line that says globalpowertune, remove the # symbol at the beginning and change the value from 20 to 7.
Here's a link to some basic vi editing commands if you're interested: Linux for Beginners - Editing files with vi
Okay, so now that the settings are changed, we need to save the file with the new settings. To do that, exit out of editing mode by hitting escape a couple of times. The "insert" at the bottom of the page should disappear.
After that, at the green prompt, you are going to type "wq", which is write and quit.
And voila, you're done! It took me hours to figure all this out and you were able to do it in 10 minutes, luck you! :)
In case you run into any trouble, I'm going to give you a very important command... " :q! " This is quit without saving changes. If you make a mistake, just quit without saving and you can go back into vi and start over.
Now you saved your local.conf and quit and your back at the black ethOS screen and your wondering what to do next :) The first thing you should do is type "update" and hit enter. In a couple of seconds, you'll be presented with a lot of neat and important information! Here's a screenshot of mine:

Here you can see some very useful information such as cpu temp, GPU temp which is the "temp" lines. My temps are shown as 57.00 49.00 42.00 56.00 51.00 and 52.00. I'm surprised to see such a difference in the temperatures between the cards. But as long as you stay under 75C, preferably 70C you should be fine. You can see my temps are way below and I'm very happy to see that! You'll also see your hash rate, mine was at 190.8 at the time :) Fan rpm's, gpu models and other related info.
Here are a couple of other commands you can use:
1. show miner - You can use the command show miner to see the actual mining process and hash rate of each card. To exit out of this screen hit "CTRL" and "C" at the same time. It's pretty cool to see the info here.
2. minestart and minestop will do just that. Stop the video cards from mining.
I'm sure there's more you can do, but you'll have to Google it, just like I will to find out :)
I really hope you found this guide useful and that you're rig is up and running and each card is mining away at 31MH's!
Monday, August 21, 2017
Configuring Windows 10 with 6 NVidia GTX 1070 video cards for mining ethereum.
Okay, so we configured ethOS with great results! Now it's time to go through the Windows setup and configuration to mine ethereum! I'm not going to go into as much detail on the Windows steps, figuring that most people reading this are familiar enough with Windows to create directories and navigate using a command prompt :) If you need more detailed steps, please let me know and I'll be happy to help.
Step 1: Configure BIOS to start computer after power loss
The first step is very important. When first powering on your rig, as soon as it comes on, hit F-9 (on most motherboards, if not yours, see your manual) to enter the bios setup. What you want to do, is look for a setting that determines what your computer will do after a power loss. What this means is that if your rig is up and running and the power goes out, causing your rig to power off, what will it do after the power is restored. You want your rig to automatically turn back on, so change the "Restore AC Power Loss " to Power On.
While you're installing Windows 10 and then updating Windows 10 on your rig, I suggest going to your motherboards manufacturers website and download the Windows 10 drivers that you will need to install once Windows 10 is up and running. The primary ones being the chipset and network card drivers (in case Windows doesn't recognize the network card). You can install the audio and other drivers if you like, but they are not needed. Put them on a thumb drive so you have them ready once your rig is updated.
Step 2: Install Windows updates
So now you installed Windows 10 and you're at the desktop for the first time. The very first thing that you're going to want to do is install any and all Windows updates. In the search bar at the bottom, type in "Check for updates". You will see the option at the top, launch Windows update and check for and install updates. After the first round is installed, run check for updates again and repeat until it says that your computer is up to date.

Step 3: Disable sleep mode
The next step we are going to do, is to tell Windows to not go to sleep due to inactivity. The last thing you want while your rig is mining, is for it to go to sleep :)
In the search bar in the lower right, type in "power settings". Then click on the "power & sleep settings" bar. In the "Screen" and "Sleep" drop downs, choose never. You can change the screen setting to your own preference, my preference is to set it to never.
Step 4: Configure Windows to automatically log in
The next step is going to be to set your Windows profile to automatically log in. We've already set up the bios to power on in the event of a power outage. So now we want it to automatically log into Windows, so it's not sitting there waiting for a password to be entered before loading windows.
To do so, in the search bar, type "netplwiz" and click on the bar at the top that says netplwiz run command. Uncheck the box that says "Users must enter a user name and password to use this computer". Then click apply and enter your password. Now your rig will reboot and log into Windows automatically.
Step 5: Disable automatic updates
Next, we will turn off automatic updates so you don't have updates installed and have your rig reboot in the middle of the night, day, etc... Rather than detail the steps, I'm going to refer you to a well documented web page with various methods. I recommend using the How to prevent automatic updates using the Local Group Policy Editor if you're using professional or enterprise edition.
Step 6: Install video card drivers
The next step will be to download and install the Windows 10 drivers for your video cards. You can can download the NVidia drivers here: NVidia video card driver download.
Once the drivers are downloaded, install and reboot your computer.
Step 7: Download Ethminer and MSI Afterburner
Okay, so now we have the basics in Windows configured and we can get to the fun stuff :)
You will need to download two pieces of software.

Launch afterburner and the first thing we are going to do is set Afterburner to launch with Windows. So click the square under "Startup", so that it launches with Windows. Any settings you make or use, will be discarded if afterburner is closed. You want to keep Afterburner open/minimized while mining. This will start up Afterburner with the last used settings in the event the rig loses power or you reboot.
Power limit is the power supplied to the video cards. You use this to reduce the power being used, which in returns, reduces the overall power usage by your rig.
Memory clock increased your video cards memory clock, thus increasing your hash rate.
I spent a lot of time researching and testing these settings and found for my rig, the best settings are running the Power Limit at 80 and the Memory Clock at +665.
You can test and tweak these setting to find the best setting for you, but if you're using a similar setup, these will work great. Using these settings, I was able to produce a 190+ MH rate on etherpool, which is my primary ethereum mining pool.
A lot of people recommend a 70/650 setting, but I found by increasing my power a bit, I was able to increase my memory clock to 665 and keep it stable. Any lower on the power and one or more of my video cards would crash, requiring a reboot. Any higher on the memory clock and the same results. The combination of 80/+665 result in a steady, high hash rate for me.
Once you find your ideal settings, save the profile so you won't have to manually adjust the settings. To do so, click the save icon to the right of the number 5 under "Profile". Numbers 1-5 should begin to flash red. Click the number where you would like to save it and you're done. This allows you to save 5 profiles, so you can switch between if you're testing or find better settings with a different miner when you switch coins.
Step 9: Configure ethminer
The first thing we need to do here is enable hidden file extensions. This will allow you to create a batch file easily.
In the search bar, type "file extensions" and then click on the "Show or hide file extensions" bar.

Choose the "Show hidden files, folders or drives" radio button. Uncheck the 3 hide boxes as shown above. Then click apply and okay.
You can define your folder structure how you like, but for an example, I created a folder called mining on the root of C: and then will create a different sub directory for each coin I mine.
Either way, using Windows Explorer, go to the folder where you have the ethminer files. It should the same as the image below. In there, you are going to right click on a blank space and choose "New text document". When it creates the document, you are going to name it "miner.bat". Make sure you remove the .txt! The name should be "Whateveryouwant.bat". The .bat defines it as a batch file.

In the screenshot, you can see my miner.bat and the "new text document" I created to give you an example, that you will use to create your batch file.
Once you created the miner.bat file, right click on it and choose edit. Once it's open in Notepad, create the following entry.

You will change the "us1.ethermine.org:4444" to the address of the pool you have chosen to mine. Again, I am using ethermine.org, so that's their closest address to my location. Most pools have their server listings on the main page. Next, change the "0xXXXXXXXXXXXXXXX" to your ethermine wallet address.
Once that is done, click file, save and then close the window.
Step 10: Add ethminer batch file to the startup folder
We're going to do two things in this step. Create a shortcut on the desktop and also in the startup folder. At this point, you should still have Windows Explorer open. Right click on the miner.bat file you created and choose copy. Then go to a blank area of your desktop, right click and choose "paste shortcut". This will place a shortcut on your desktop to easily launch ethminer.
Now, navigate to the following folder in Windows Explorer: C:\Users\Yourprofilename\AppData\Roaming\Microsoft\Windows\Start Menu\Programs\Startup. Right click on the blank area and choose "Create shortcut" again. This will place a shortcut to your ethminer in the startup folder so when Windows starts, it will automatically launch ethminer for you. Neat, huh? With the changes we've made... if your rig looses power, when the power is restored, your computer will power on, Windows will automatically log in and then launch ethminer for you!
Step 1: Configure BIOS to start computer after power loss
The first step is very important. When first powering on your rig, as soon as it comes on, hit F-9 (on most motherboards, if not yours, see your manual) to enter the bios setup. What you want to do, is look for a setting that determines what your computer will do after a power loss. What this means is that if your rig is up and running and the power goes out, causing your rig to power off, what will it do after the power is restored. You want your rig to automatically turn back on, so change the "Restore AC Power Loss " to Power On.
While you're installing Windows 10 and then updating Windows 10 on your rig, I suggest going to your motherboards manufacturers website and download the Windows 10 drivers that you will need to install once Windows 10 is up and running. The primary ones being the chipset and network card drivers (in case Windows doesn't recognize the network card). You can install the audio and other drivers if you like, but they are not needed. Put them on a thumb drive so you have them ready once your rig is updated.
Step 2: Install Windows updates
So now you installed Windows 10 and you're at the desktop for the first time. The very first thing that you're going to want to do is install any and all Windows updates. In the search bar at the bottom, type in "Check for updates". You will see the option at the top, launch Windows update and check for and install updates. After the first round is installed, run check for updates again and repeat until it says that your computer is up to date.

Step 3: Disable sleep mode
The next step we are going to do, is to tell Windows to not go to sleep due to inactivity. The last thing you want while your rig is mining, is for it to go to sleep :)
In the search bar in the lower right, type in "power settings". Then click on the "power & sleep settings" bar. In the "Screen" and "Sleep" drop downs, choose never. You can change the screen setting to your own preference, my preference is to set it to never.
Step 4: Configure Windows to automatically log in
The next step is going to be to set your Windows profile to automatically log in. We've already set up the bios to power on in the event of a power outage. So now we want it to automatically log into Windows, so it's not sitting there waiting for a password to be entered before loading windows.
To do so, in the search bar, type "netplwiz" and click on the bar at the top that says netplwiz run command. Uncheck the box that says "Users must enter a user name and password to use this computer". Then click apply and enter your password. Now your rig will reboot and log into Windows automatically.
Step 5: Disable automatic updates
Next, we will turn off automatic updates so you don't have updates installed and have your rig reboot in the middle of the night, day, etc... Rather than detail the steps, I'm going to refer you to a well documented web page with various methods. I recommend using the How to prevent automatic updates using the Local Group Policy Editor if you're using professional or enterprise edition.
Step 6: Install video card drivers
The next step will be to download and install the Windows 10 drivers for your video cards. You can can download the NVidia drivers here: NVidia video card driver download.
Once the drivers are downloaded, install and reboot your computer.
Step 7: Download Ethminer and MSI Afterburner
Okay, so now we have the basics in Windows configured and we can get to the fun stuff :)
You will need to download two pieces of software.
- Ethminer - Cuda optimized for Windows 10 - Please note that I found this package when doing my research and it's what I am currently using. It's a package on cryptoming blog that has the necessary additional files included in the folder.
- Then download and install MSI Afterburner - this is the utility that you will use to over clock your video cards.

Launch afterburner and the first thing we are going to do is set Afterburner to launch with Windows. So click the square under "Startup", so that it launches with Windows. Any settings you make or use, will be discarded if afterburner is closed. You want to keep Afterburner open/minimized while mining. This will start up Afterburner with the last used settings in the event the rig loses power or you reboot.
Power limit is the power supplied to the video cards. You use this to reduce the power being used, which in returns, reduces the overall power usage by your rig.
Memory clock increased your video cards memory clock, thus increasing your hash rate.
I spent a lot of time researching and testing these settings and found for my rig, the best settings are running the Power Limit at 80 and the Memory Clock at +665.
You can test and tweak these setting to find the best setting for you, but if you're using a similar setup, these will work great. Using these settings, I was able to produce a 190+ MH rate on etherpool, which is my primary ethereum mining pool.
A lot of people recommend a 70/650 setting, but I found by increasing my power a bit, I was able to increase my memory clock to 665 and keep it stable. Any lower on the power and one or more of my video cards would crash, requiring a reboot. Any higher on the memory clock and the same results. The combination of 80/+665 result in a steady, high hash rate for me.
Once you find your ideal settings, save the profile so you won't have to manually adjust the settings. To do so, click the save icon to the right of the number 5 under "Profile". Numbers 1-5 should begin to flash red. Click the number where you would like to save it and you're done. This allows you to save 5 profiles, so you can switch between if you're testing or find better settings with a different miner when you switch coins.
Step 9: Configure ethminer
The first thing we need to do here is enable hidden file extensions. This will allow you to create a batch file easily.
In the search bar, type "file extensions" and then click on the "Show or hide file extensions" bar.

Choose the "Show hidden files, folders or drives" radio button. Uncheck the 3 hide boxes as shown above. Then click apply and okay.
You can define your folder structure how you like, but for an example, I created a folder called mining on the root of C: and then will create a different sub directory for each coin I mine.
Either way, using Windows Explorer, go to the folder where you have the ethminer files. It should the same as the image below. In there, you are going to right click on a blank space and choose "New text document". When it creates the document, you are going to name it "miner.bat". Make sure you remove the .txt! The name should be "Whateveryouwant.bat". The .bat defines it as a batch file.

In the screenshot, you can see my miner.bat and the "new text document" I created to give you an example, that you will use to create your batch file.
Once you created the miner.bat file, right click on it and choose edit. Once it's open in Notepad, create the following entry.

You will change the "us1.ethermine.org:4444" to the address of the pool you have chosen to mine. Again, I am using ethermine.org, so that's their closest address to my location. Most pools have their server listings on the main page. Next, change the "0xXXXXXXXXXXXXXXX" to your ethermine wallet address.
Once that is done, click file, save and then close the window.
Step 10: Add ethminer batch file to the startup folder
We're going to do two things in this step. Create a shortcut on the desktop and also in the startup folder. At this point, you should still have Windows Explorer open. Right click on the miner.bat file you created and choose copy. Then go to a blank area of your desktop, right click and choose "paste shortcut". This will place a shortcut on your desktop to easily launch ethminer.
Now, navigate to the following folder in Windows Explorer: C:\Users\Yourprofilename\AppData\Roaming\Microsoft\Windows\Start Menu\Programs\Startup. Right click on the blank area and choose "Create shortcut" again. This will place a shortcut to your ethminer in the startup folder so when Windows starts, it will automatically launch ethminer for you. Neat, huh? With the changes we've made... if your rig looses power, when the power is restored, your computer will power on, Windows will automatically log in and then launch ethminer for you!
Subscribe to:
Comments (Atom)